Step 1
First we are going to smoothen the woman’s skin so open the stock image of the woman. I used the full size of the image but you can use a smaller size. Then create a new layer above it and name it smooth skin. (I duplicated the stock image but you don’t have to because it increases the file size unnecessarily).In order to smoothen the woman’s skin I used the Mixer Brush Tool (B) (the first time I used this tool since I use Photoshop)
Use the brush settings shown in the image below.
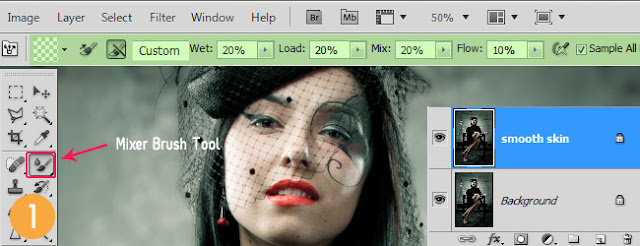
Now, this is how you use the Mixer Brush Tool to soften the skin. With the settings shown in the image above you will apply a small amount of softness by mixing the pixels every time you make strokes with the brush. It’s almost like the Smudging Tool but it doesn’t destroy the pixels quite as much. And because you have the option to Sample All All layers you can paint on a blank layer without the fear of destroying the original image.
You must use a soft brush and adjust the size of it depending on the area you’re working on. Generally you don’t want to use a small brush because you will create visible lines and your goal is to have soft transitions.
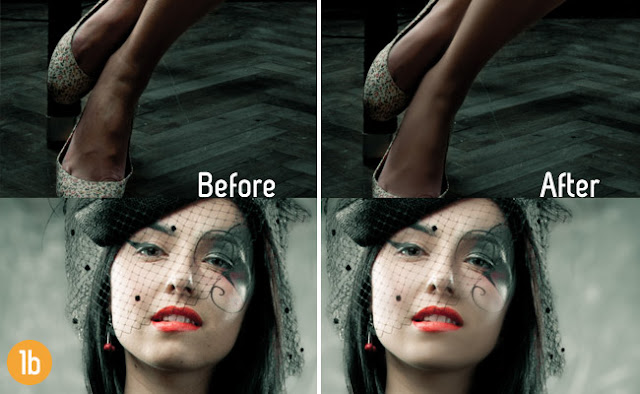
You must be careful with highlights and shadows though. You must follow the lines of the shadows and the highlights and follow their direction otherwise you will “smudge them” and you will destroy the shapes of the body. With a bit of practice you will get it. Here is my before and after. It took me about 10-15 minutes to soften the skin.
Step 2
Next use the Clone Tool (S) to remove the pill in the woman’s hands which we will later replace with a burning love note. I used Sample All Layers and painted with the clone tool on a new layer to preserve the original intact. Use this tool to remove the pill an reconstruct the tips of the fingers.
Step 3
Let’s start making the first adjustments. Create a Color Balance adjustment layer and add a blue tint to the overall image.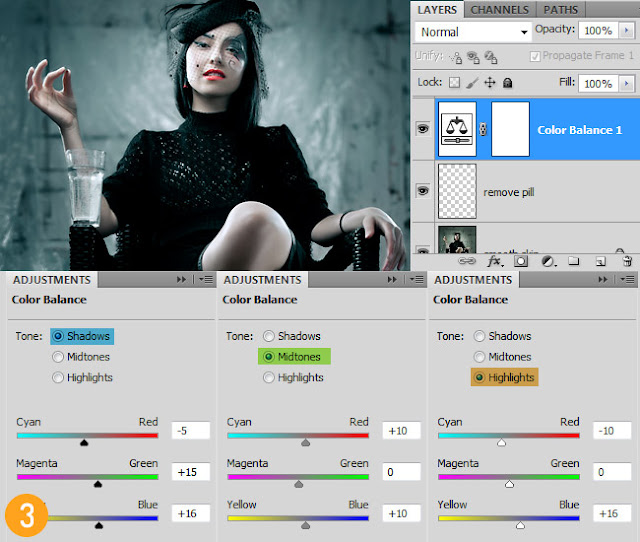
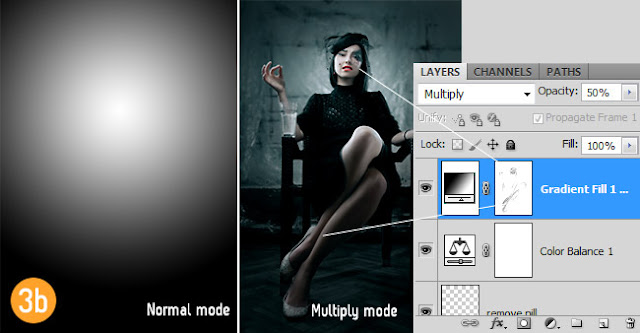
Now create a Gradient Fill adjustment layer with the default Black to White gradient, position it so that the white part is over the woman’s head and chest area and change the blend mode to Multiply. I used the layer mask to mask some parts and bring back some of the the highlights darkened by the gradient on the feet, face and hands.
Step 4
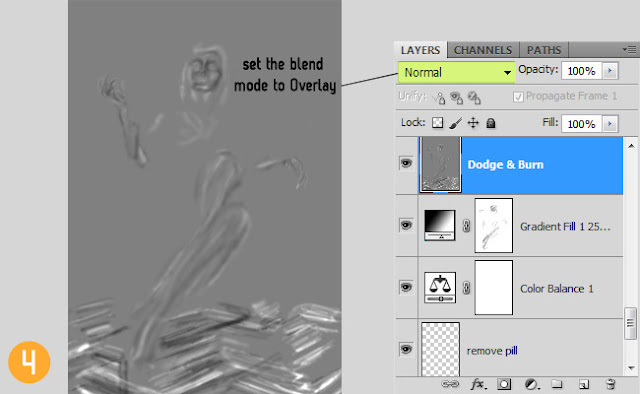
Now comes the dodging and burning part. If you want to work non-destructively, create a layer filled with 50% Gray on Overlay blend mode and use the Dodge&Burn tool on this layer.I already made several tutorials about how to use this technique but basically, you burn the shadows and dodge the highlights with a soft brush with an Exposure setting of about 10% on the Midtones Range. On the image below you can see where I used the Dodge and burn tool. (Shown in Normal blend mode for illustration purposes).
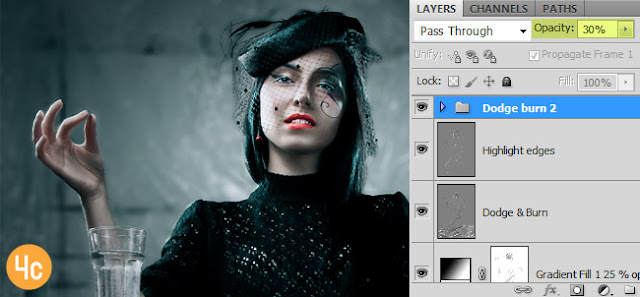
Next I highlighted the edges using the Dodge Tool (also the burn tool in some places) but with a much higher Exposure (about 30-40%). You can use the same layer as before but I preferred to have these edges painted on a separate layer just in case I mess up somewhere.
What I did here is dodge the edges of the lips, the eyelids, nostrils, brighten the teeth and the eyes, the hair, the edges of the fingers and the shoes, etc.

For an even stronger effect, I duplicated the Dodge & Burn and the Highlight edges layers, put them in a group and decreased the opacity until I got it to look how I wanted.
Step 5
Create a new layer, name it glass fire 1. Now open the Magic_fire_02 stock image, paste it over your canvas and change it’s blend mode to Screen. Now create a layer mask and mask everything but the glass area. You can unlink the maks and move the fire around until you find the best position.To make the fire more vibrant, add Inner Shadow with Distance 0, and Size about 50px (depending on the size of your canvas. Cover pretty much all the area of the glass) and change the blend mode of the shadow to Softlight. That will increase the contrast and color of the fire.

Now open the glass fire 2 stock image (221130_4202.jpg) and place it over the top part of the glass using the Screen blend mode. See image 5b.
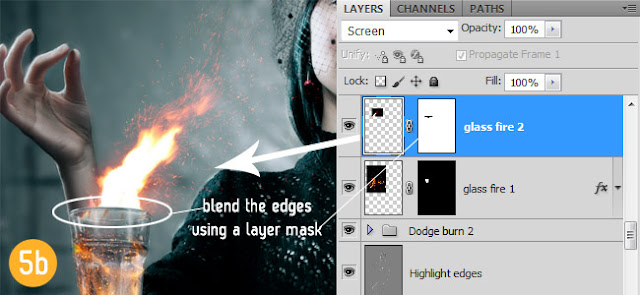
Step 6
Now it’s time to add some light effects. In order to make the fire in the glass more realistic, create some glow using a soft brush. I used the color #7f4500 on a new layer set on Color Dodge then I duplicated the layer and changed the blend mode to Screen.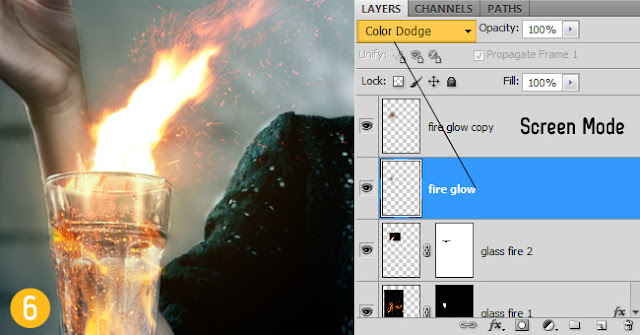
Step 7
For more realism, create the light casted by the fire on the woman’s body. Mainly on the hand near the glass, on the neck and the knee. I used two layers, both set to color dodge but you can use a single layer if you want.The base color used for this effect was #5E3403 but you will have to change it depending on the area you want to paint on. For a stronger/brighter light use a brighter tone and for a less bright light, use a darker color.

Step 8
Now let’s create that love note. Open the burnt paper stock image in Photoshop and remove the white background using the Magic Want Tool (W). Make it a bit smaller and rotate it so that you can add text to it. Use the type tool to add some text to it. I used the font Sweetly Broken. You can also use a photo if you want.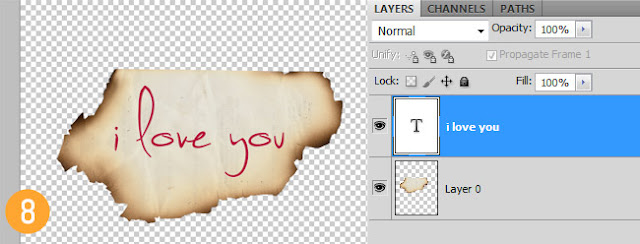
Next, merge the two layers (the text layer and the paper layer) using Ctrl+E. Copy the merged layer on your canvas.
Now you can use the Free Transform Tool (Ctrl+T) to distort the paper and place it over to woman’s hand. Use a layer mask to cover unwanted parts and make it look like it’s between the woman’s fingers.

Step 9
Create the finger shadow on the paper and use Levels to darken the Midtones and increase the contrast of the paper. I used clipping masks for both layers.
Step 10
Open the paper fire image (Fire_stock_7) and copy it to your document. Change the blend mode of the layer to Screen and use the Transform Tool (Ctrl+T) to make it fit your paper note. You can use the Warp Tool to make more precise adjustments.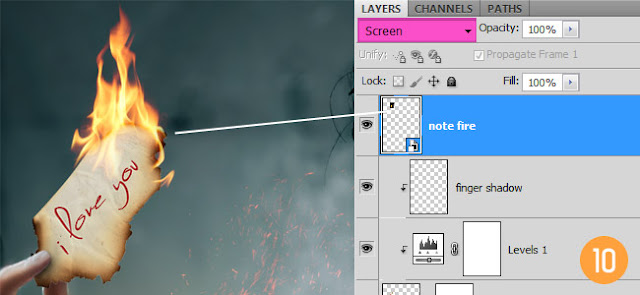
Step 11
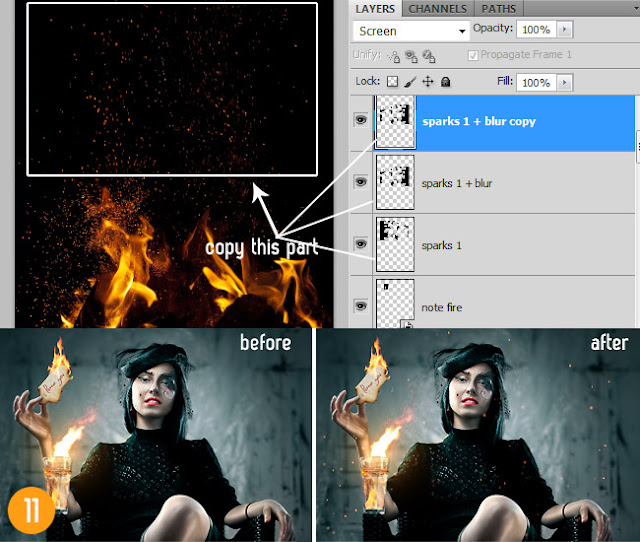
We are going to use the Magic_fire_02 again to add some sparks flying through the air. So use the Rectangular Marquee Tool (W) to copy the top part of that stock image to your canvas.Set the layer’s blend mode to Screen to get rid of the black background and use the Eraser Tool (E) or a layer mask to remove some of the sparks. Only leave a few random ones with some separation between them. You can then duplicate the layer and apply some Gaussian Blur for an out of focus effect which will give you a bit more of depth.
Step 12
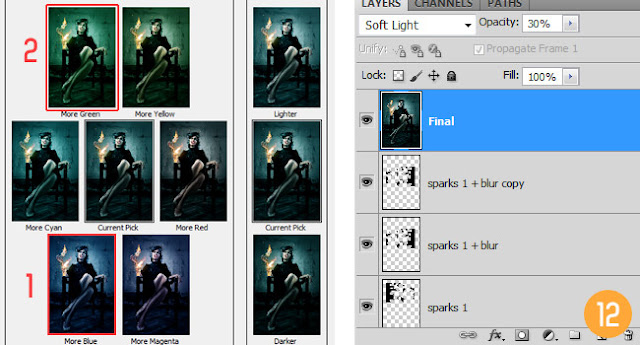
As a last adjustment, I created a stamp with Shift+Ctrl+Alt+E (Shift+Command+Option+E for Mac users). You can also select the entire canvas, go to Edit>Copy Merged and then paste the copied image on top of all the other layers.When you have the new layer (which i named Final) go to Image>Adjustments>Variations and click on More Blue and then on More Green in this order and click OK.
Now drop the layer’s Opacity to 30% and set the blend mode to Softlight.
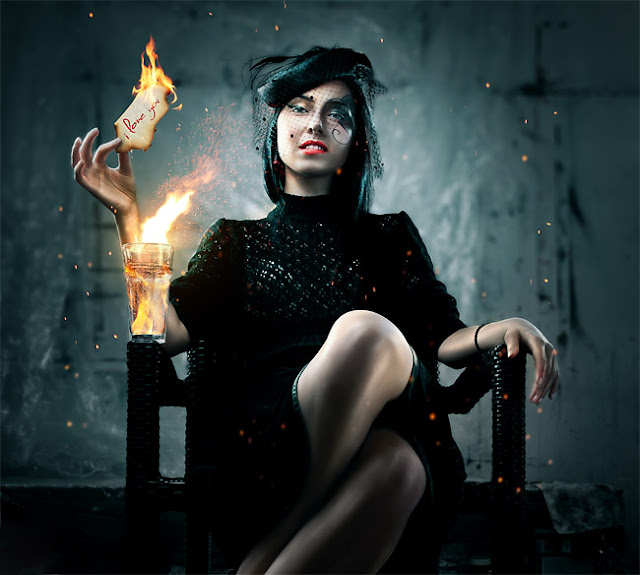
Congratulations, you’re done. Hope you enjoyed this tutorial. If so, please take a moment and share it. See you on the next tutorial.
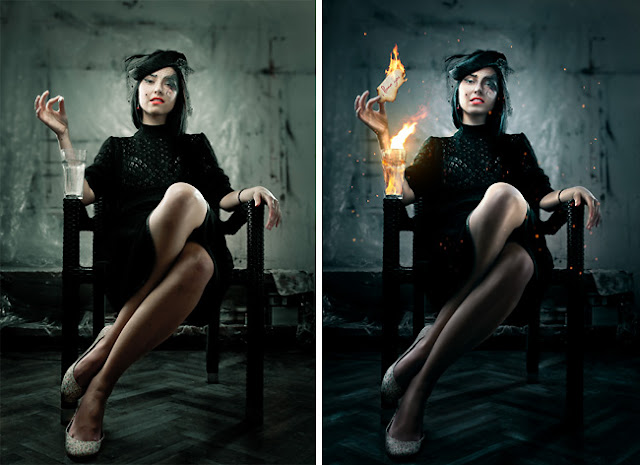
Final result (before and after)
