
How To Create a Photo Manipulation
In this photo manipulation tutorial I’ll show you how to create a sunrise mountain landscape with Photoshop. You’ll learn how to combine several stock images, adjust color, create lighting, enhance the atmosphere and more.
Final Image

Create a Photo Manipulation Step 1
Create a new 1728×1000 px document in Photoshop with the settings below:

Create a Photo Manipulation Step 2
Open the landscape image. Drag this image into the white canvas using the Move Tool (V) .

Create a Photo Manipulation Step 3
Go to Edit > Transform > Flip Horizontal :

Create a Photo Manipulation Step 4
There are unwanted people on the cliff. Hit Ctrl+Shift+N to make a new layer. Activate the Clone Tool (S) and use this tool to remove the indicated people.


Create a Photo Manipulation Step 5
Go to Layer > New Adjustment Layer > Color Balance and change the Midtones settings.


Create a Photo Manipulation Step 6
Open the mountains image. Place this image over the middle section of the canvas.

Create a Photo Manipulation Step 7
Click the second icon at the bottom of the Layers panel to add a mask to this layer. Use a soft black brush to remove the hard edges, reduce the mountains’ opacity to help blend them with the background.

Create a Photo Manipulation Step 8
Create a Hue/Saturation adjustment layer and set it as Clipping Mask . Bring the Saturation value down to -65 :
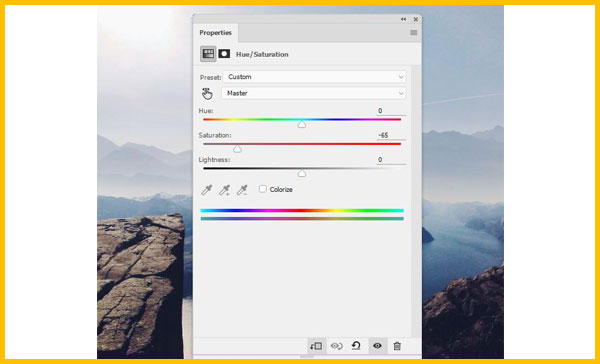

Create a Photo Manipulation Step 9
Open the sky image. Use the Rectangular Marquee Tool (M) to select the sky only and place it over the top of the scene.

Add a mask to this layer and use a soft black brush to blend the sky with the background.

Create a Photo Manipulation Step 10
Create a Color Balance adjustment layer (set as Clipping Mask ) to match the color of the sky with the rest.

Create a Photo Manipulation Step 11
Make a Curves adjustment layer to brighten the sky. On this layer mask, use a soft black brush to erase the top and leave the bright effect visible on the lower left.


Create a Photo Manipulation Step 12
Open the woman image. Isolate the woman from the background and add her to the top of the cliff.

Create a Photo Manipulation Step 13
Use a Hue/Saturation adjustment layer to change the woman’s color:

Create a Photo Manipulation Step 14
Make a Hue/Saturation adjustment layer on top of the layers and alter the Reds values.


Create a Photo Manipulation Part2
Resources
Landscape Mountains Sky Woman Bird brushes


