

Step 1
In this step we are going to create the background scene.
1) Import the riverside image on to the canvas and place it as shown, then erase the top end of the image with a soft eraser.


2) Now import the image of clouds on to the canvas and place it behind the previous image.

Step 2
In this step we are going to color correct both the riverside image. 1) Select the riverside image and open the Exposure adjustment layer and set the Gamma Correction level to 0.81.
2) Now open the Hue/Saturation adjustment layer and reduce the Saturation level to -47. Since this is a cloudy scene we don’t want the scene to be colorful and bright, on the contrary we want it to be dramatic with low saturated colors.

3) Now by using the Curves adjustment layer set the RGB curves as shown.

Step 3
In this step we are going to color correct the sky and blend it with the riverside image.1) With the sky layer selected open the Curves adjustment layer and set the RGB curves as shown.

2) Now by using the Hue/Saturation adjustment layer set the Saturation level to -61.

3) Now to enhance the shadows of the cloud layer open the Exposure settings and set the Gamma Correction level to 0.81.

Step 4
In this step we are going to extract the model from the source image without compromising any details.1) Import the image of the model into Photoshop and cut the image as shown using the Pen Tool (P) or Lasso Tool (L). Leave the complex areas of the image to Refine Edge option.

2) Now select a mask around the model and open the Refine Edge option and set the Adjust Edge settings as shown. Then by using the Refine Radius Tool, paint the complex areas of the image and let the Refine Edge option work its magic. Once you are satisfied with the result, export it into a new layer.

Step 5
In this step we are going to integrate the model image in the scene.1) Import the image of the model on to the working canvas and place it as shown.

2) Reduce the brightness of the model by decreasing the brightness of the layer to -92 using the Brightness/Contrast adjustment layer.

3) Now by using the Hue/Saturation adjustment layer set the Saturation level to -65.
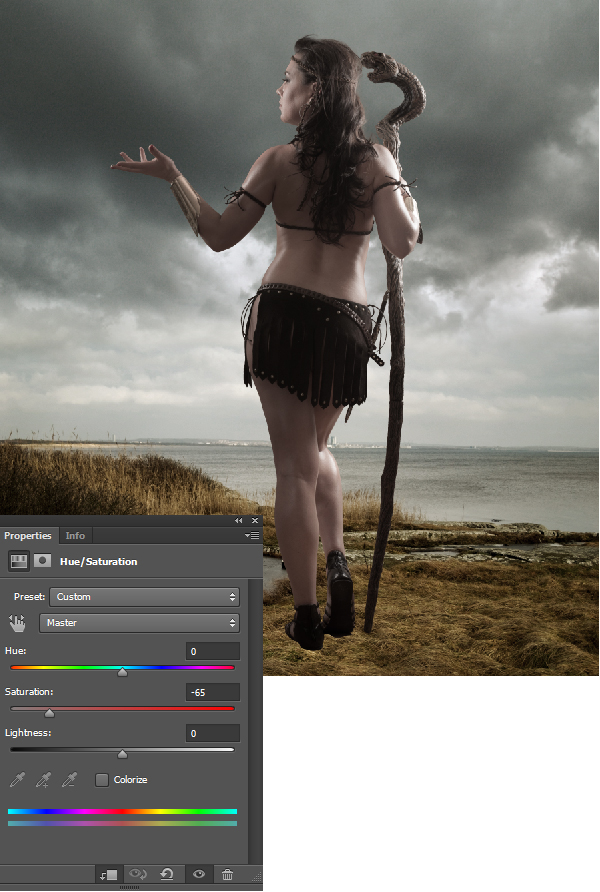
4) To enhance the shadows on the model, open the Exposure settings and set the Exposure level to -0.02 and Gamma Correction level to 0.75.

5) With the model layer selected open Curves and set the RGB curves as shown.

Step 6
In this step we will be working on painting the shadows digitally. Use of a digital pen tablet is highly recommended.1) Create a new layer on the top of the Layers palette and paint dark edges around the scene as shown.

2) Now create a new layer above the model layer and select the soft brush and make sure the pen pressure option is ON. Then gently paint the shadows as shown.

Step 7
In this step we are going to add bushes in the scene, which are placed closer to the lens view in order to create a depth of field to the scene and make it look natural.1) Import the image of the bushes on to the working canvas and place the bushes at the bottom of the scene as shown.

2) With the bushes layer selected go to Filters>Blur>Gaussian Blur and set the blur Radius level to 9.1px.

3) Similarly add few more bushes in the scene as shown.

4) Now create a new layer under the bushes layers and paint thin fog as shown at the bottom of the scene.

5) Now import image of tall grass and place it in the scene as shown. Make sure to place this layer under the previously created fog layer.

6) Now add Gaussian blur of Radius 1.5px to the tall grass layer.

Step 8
In this step we will be color correcting the previously added grass and plants.1) Group all the bushes and grass layers into a single folder and add a Hue/Saturation adjustment layer to it. Then set the Saturation level to -35.

2) Now add an Exposure adjustment layer to the folder and set the Gamma Correction level to 0.69.

Step 9
In this step we will be creating distant hills in the scene.1) Import the image of distant hills on to the working canvas and place the image on the horizon of our scene as shown. Then by using the Magic wand and Eraser tool erase the sky and other unwanted part of the image.

2) With the distant hills layer selected open Hue/Saturation and set the Saturation level to -73.

3) Now by using the Curves adjustment layer set the RGB curves as shown.

4) Since the scene is filled with fog and clouds the distant hills should be almost mixed with the fog in the scene. Hence add an Exposure adjustment layer and set the Offset level to +0.1589 and Gamma Correction level to 1.25.

Step 10
In the following steps we will be creating few vertical tower hills in the scene. So, it’s always better to have a blueprint of the concept before proceeding with it. Hence by using the Line tool draw the prospective lines and draw a rough sketch of the tower hills in a new layer as shown.
CONTINUED: Photo Manipulate a Mystical Tribal Warrior.(Part 2).


